Tuesday, 1 April 2014

Reset List Item ID value numbering at 1

Reset List Item ID value numbering at 1

One of the most common problem we face in SharePoint Lists is there is no direct option to reset the value of ListItem ID. In development environment we used to insert and delete lot of test records and during this time ID value automatically increased since ID column is a incrementer type. Finally when we move the site to staging and production environments using backup and restore the ListItem ID value will not start with 1.

But we do not have a OOB option to reset this value. But in the backend content database we can reset this value for any list. The following query will be used to reset value.

UPDATE <Content DB>.dbo.AllListsAux set NextAvailableId=1 where ListID='<GUID>'

Here you can see a table called AllListsAux. This list maintans Item count and Id details for all lists.

Please note we have to be very careful while doing any opertation in backend.


Or


Save the list as a template and recreate the list. ID columns will always keep incrementing and will never be reused.

Tuesday, 18 March 2014

Restrict users to overwrite files in document library

The Code should be on 'ItemAdding' event handler. Where you check if the FileName already exist in the List, if yes cancel the adding of document. Since, if you check of 'ItemUpdating' it will stop user from updating the existing document.


 public override void ItemAdding(SPItemEventProperties properties)
{

base.ItemUpdating(properties);
   if (properties.ListItem.File.Exists)
   {
    properties.ErrorMessage = "File Allready exists uploaded by other user.";
    properties.Status = SPEventReceiverStatus.CancelWithError;
    properties.Cancel = true;

   }

}

Sunday, 9 March 2014

Implement Feature Stapling in SharePoint.


Scenario

I want a custom list to be created by default whenever a site is created using the Team Site template. The best way to do this is to create a Feature Stapling. 

Feature Stapling

Feature Stapling can be created for the site definition that is already in use. Feature Stapling has two features.
  1. Stapler feature: staples another feature to the site definition
  2. Staplee feature: that which will be stapled
Steps involved
The following is the procedure steps to to implement Feature Stapling in SharePoint:
  1. Create Empty SharePoint Project
  2. Create a feature
  3. Create the feature stapler
  4. Create FeatureAssociation.xml
  5. Deploy the solution
  6. Check whether the feature stapler is activated in a web application
  7. Testing
Create Empty SharePoint Project
  1. Open Visual Studio 2010 by going clicking "Start" then select "All Programs" | "Microsoft Visual Studio 2010" then right-click on Microsoft Visual Studio 2010 and click on "Run as administrator".
  2. Go to the File tab, click on "New" and then click on "Project".
  3. In the New Project dialog box, expand the Visual C# node, and then select the SharePoint 2010 node.
  4. In the Templates pane, select "Empty SharePoint Project".
  5. Enter the Name as FeatureStapling and then click "OK". 

    Share1.jpg
     
  6. Enter the local site URL for debugging, select "Deploy as a farm solution" as in the following and then click on "Finish".

    Share2.jpg
Create a feature
In this section you will see how to create a new feature and feature receiver to create a custom list in the site.
  1. In the Solution Explorer, right-click on the Feature folder and then click on "Add Feature".

    Share3.jpg
     
  2. Rename the feature to "CreateListFeature".
  3. Double-click on the feature and enter the Title and Description for the feature.

    Share4.jpg
     
  4. Select the scope as web from the drop down list.
  5. Right-click on CreateListFeature and then click on the Add Event receiver.

    Share5.jpg
     
  6. Double-click on CreateListFeature.EventReceiver.cs and replace the code with the following:

    Share6.jpg
     
  7. The code above creates a custom list on the feature activated.
Create feature stapler
In this section you will see how to create a feature stapler that is used to staple the CreateListFeature to the site definition.
  1. In the Solution Explorer, right-click on the Feature folder and then click on "Add Feature".

    Share7.jpg
     
  2. Rename the feature to "FeatureStapler".

    Share8.jpg
     
  3. Double-click on the feature and enter the Title and Description for the feature.

    Share9.jpg
     
  4. Select the scope as WebApplication from the drop down list.
Create FeatureAssociation.xml
In this section you will see how to create the XML file to associate the feature to the site definition.
  1. In the Solution Explorer, right-click on the project, click on "Add" and then click on "New Item".
  2. Select the "Empty Element" template, enter the Name and then click on "Add".

    Share10.jpg
     
  3. Double-click on Elements.xml and replace with the following:

    Share11.jpg

    Id - CreateListFeature feature Id.

    Template Name: To which site template the feature should be associated (the format should be <site template name><configuration number>).
     
  4. Ensure this file is added to the FeatureStapler feature (double-click on the FeatureStapler feature and see whether in the "Items in the feature" window the Elements.xml file is available).

    Share12.jpg
Deploy the solution
Right-click on the solution and then click on "Deploy Solution".
Check whether the feature stapler is activated in the web application:
  1. Open Central Administration.
  2. Click on Manage Web Applications that is available in the Application Management section.
  3. Select the web application and then click on "Manage Features" in the ribbon interface.

    Share13.jpg
     
  4. Check whether the Feature Stapler feature is activated.

    Share14.jpg
Testing
  1. Open Central Administration.
  2. Click on "Application Management".
  3. Click on "Create Site Collections" that is available under the Site Collections section.
  4. Create a new site collection using the Team Site template.
  5. Navigate to the newly created team site.
  6. Click on "All Site Content" in the quick launch bar.
  7. You will see the custom list created by default.

    Share15.jpg
Summary

Thus in this article we have seen an example for implementing the Feature Stapling in SharePoint.

Creating A New Master Page In SharePoint 2013

Creating A New Master Page In SharePoint 2013

For this example, I have used our own web site as a starting point:
 
We’re going to convert this page into a master page for use in SharePoint 2013.

Planning Out Your Master Page

A Master Page in SharePoint represents the chrome elements of a page, e.g. those areas of the site that stay the same from page to page and the associated master styles, scripts, fonts, images, etc. that should be included on every page of your site.
For our page, we want these chunks of content in our master page as well as all the governing style sheets, JavaScript, images, etc.:


The content in the middle of the page is what will governed dynamically by SharePoint using a combination of Page Layouts and dynamic content.
Before moving to SharePoint, create a stripped down HTML file that has the chrome isolated with the appropriate images, CSS, JavaScript, etc. in folders.

The dynamic content is going to go where it says, “Dynamic content will go here”.  My folder structure looks like this:
Ok, now that we’re organized, we can create our Master Page in SharePoint 2013.

Creating a SharePoint 2013 Account

Currently, you can download and install the SharePoint 2013 beta software locally, or you can create a cloud based account.  I have used the cloud based account route because its easy and free for the moment.  Go to http://www.microsoft.com/office/preview/en/office-365-enterprise to signup for an account and you will have your own SharePoint 2013 environment in the cloud.
The same instructions should work on a local version of SharePoint 2013 as well.

Creating a Publishing Site Collection

When you are first granted a SharePoint 2013 account, you are allocated a public facing web site and a collaboration site.  You can use your public facing web site, but I recommend you create a separate Publishing Site Collection for development purposes as Microsoft only allows one public facing web site in the current cloud environment.  To create a new Publishing Site Collection, go to Admin –> SharePoint –> Site Collections and click on the New Private Site Collection button.
 Now that you have a Publishing Site, you can start to customize it with your new Master Page.  Your default home page will look like this:
 

The Design Manager

If you click on “Design your site”, this will bring you to SharePoint 2013’s new Design Manager:
 You can also reach this screen by clicking on the settings menu at the top right hand of the page and clicking on Design Manager


Mapping to the Master Page Directory

Click on 4. Edit Master Pages and you will see a screen like this:
 
We’re going to Convert an HTML file to a SharePoint master page.  Click on that link and you will see this dialogue box:

This directory is the folder containing Master Page and Page Layouts as well as their dependent assets (CSS files, scripts, images, etc.).  The easiest way to manage this folder is to map a network drive in Windows to this folder.  To do this go to Windows Explorer, right click on your computer and select Map Network Drive.  Copy and paste the URL for the location of this directory (it’s at the top of this dialogue box) and put in your login credentials.  You should then get a drive letter that maps to this folder and you can copy and paste files from your local machine into SharePoint directly.
NOTE: You will get an error when you map the network drive if you don’t have the “Keep me signed in” checkbox selected when you sign into Office 2013.  Sign out, delete your cookies, and re-authenticate with this box checked and it will work. 
 
With a mapped network drive, we can simply copy our template and dependent files into this folder.
NOTE: SharePoint 2013 will allow you to create folders in this directory, so this might help in keeping organized to create a separate folder as the root of your master page and its files. 
NOTE: If you cannot map the drive, you can also upload files through the UI by going to Site Settings and Clicking on  Master pages and page layouts.

When you click on this you will access the same master page library that is used by the Design Manager. 

If you click on files you can then upload documents and create folders through the browser UI.

Creating a Master Page from HTML

Now that we have uploaded our files, we’re going to create a Master Page.  SharePoint 2013 can take your HTML file and convert it into a ASP.NET Master Page automatically.  When it does this, it will link the HTML and Master Page together so that if you change your HTML file it will sync these changes into the Master Page.  This allows designers to now work in their comfort zone with HTML, CSS, JavaScript, etc.
Go to the Design Manager.  Click on 4. Edit Master Pages and then click on Convert an HTML File  to a SharePoint master page.

Select your HTML file and click insert.
If you go to the Design Manager, you will also now see your Master Page in the list of Master Pages:


NOTE: SharePoint 2013 expects your HTML to be XML Compliant. If you have older or non-compliant HTML you will get an error. Fix your file and try again.
If you click on the Master Page, it will take you to a preview page.  At the bottom of the page you will see a Yellow Box that represents the place holder where dynamic content is going to be inserted…We’re going to now move that place holder into where we want it to replace our dummy text in the middle of the page.
Download the HTML file from the SharePoint 2013 environment (you can just copy and paste it if you have a mapped network drive) and open it in your HTML editor and you will see that SharePoint 2013 has decorated your HTML with a number of tags.  These tags are used by SharePoint 2013 as markup to specify where to put to insert content when it generates the Master Page.  You can edit and add HTML around them and add new snippets to the HTML to add dynamic navigation, content containers, metadata etc.
In your newly improved HTML file, you will see tags in the header (used to insert metadata, title and other header information), at the top of the body (used to insert the ribbon), and at the bottom you will find a div called “ContentPlaceHolderMain”.
This is a content place holder and is used by the Page Layout to inject content dynamically.  You can move this place holder into the appropriate spot in your HTML to insert the content correctly.

Publishing Your Master Page

The last step is we need to publish our master page – its currently in draft.  If you don’t publish it you won’t see it in the Site Master Page Settings drop down menu.  To publish your page, go to Site Settings –> Master pages and page layouts and then find your HTML file.  Hit the publish button on the ribbon.
NOTE: If you try to publish the master page itself you will get an error because it is linked to the master HTML file.  If you publish the HTML file, the master page is automatically published as well.

Assigning Your Master Page to your Site

Now that your master page is published, you can assign it to your site.  All pages in your site will adopt this new chrome.  Publish sites have two types of pages: 1) publishing pages and 2) system pages.  Publishing pages are traditional web pages and System pages are views of lists, document libraries and other administrative pages.  You can assign your master page to either type of pages.
To assign your master page, go to Site Settings –> Master Page (under Look and Feel) and select your master page from the drop down list (if its not there then you probably didn’t publish it successfully or it has errors).  Your site will now adopt your new look and feel!
Here is my default site with the Master Page site assigned.

Thursday, 20 February 2014

Enable users or groups to use personal and social features

Enable users or groups to use personal and social features

Use this procedure to configure the user permissions for personal and social features.

To enable users or groups to use personal and social features

  1. Verify that you have the following administrative credentials:
  2. In Central Administration, in the Application Management section, click Manage service applications.
  3. In the list of service applications, click User Profile Service Application.
  4. On the Manage Profile Service: User Profile Service Application page, in the People group, click Manage User Permissions.
  5. On the Permissions for User Profile Service Application page, type or select a user or group account, and then click Add.
  6. In the Permissions for box, check the feature or features that you want the user or group to be able to use, and then click OK.

Tuesday, 28 January 2014

APPs Development on Office 365

Sign up for an Office 365 Developer Site

apps for Office and SharePoint
 
 
Learn how to sign up for an Office 365 Developer Site to develop, test, and deploy apps for Office and SharePoint.
Applies to:  Office 365 | SharePoint Server 2013 | SharePoint Foundation 2013 | Visual Studio 2012 | apps for Office | apps for SharePoint 


Use an Office 365 Developer Site as a development and testing environment to shorten your setup time and start creating, testing, and deploying your apps for Office and SharePoint. Deploy the "Napa" Office 365 Development Tools to this preconfigured SharePoint site and you also get a head start on developing SharePoint-hosted apps, and apps for Office documents and mail items, without installing Visual Studio 2012 and Office Developer Tools for Visual Studio 2012 on your development computer. With an Office 365 Developer Site, you get an isolated app domain for SharePoint-hosted apps, preconfigured to use OAuth, so that you can use the Windows Azure Access Control Service (ACS) for authenticating and authorizing provider-hosted apps for SharePoint that are deployed to this site.


You may already have access to an Office 365 Developer Site. Here are three ways to get one:
Sign up for a free Office 365 Developer Subscripti
Tip Tip
We’ll open each of these links in another window or tab to keep the following instructions handy.
This customized Office 365 subscription includes all the tools and resources you need to jump in and start building apps:
  • SharePoint Online developer site, customized for creating and testing apps
  • You can install "Napa" Office 365 Development Tools, to create your first apps right within the browser
  • Office Professional Plus 2013
  • Exchange Online
During signup, you’re asked to supply a subdomain of .onmicrosoft.com and a user ID to assign to the domain that you’re creating, as shown in Figure 1. After signup, you have to use the resulting userid (in the format userid@yourdomain.onmicrosoft.com) to sign in to your portal site where you administer your account. Your SharePoint 2013 Developer Site is provisioned at your new domain: http://yourdomain.onmicrosoft.com.
Note Note
If you’re logged into another Microsoft account when you try to sign up for a developer account, you might get this message: “Sorry, that user ID you entered didn’t work. It looks like it’s not valid. Be sure you enter the user ID that your organization assigned to you. Your user ID usually looks likesomeone@example.com or someone@example.onmicrosoft.com.”
If you see this message, log out of the Microsoft account you were using and try again. If you still get the message, clear your browser cache or switch toInPrivate Browsing and then fill out the form.
Figure 1. Office 365 Developer Site domain name

Office 365 Developer Site domain
Note Note
When you finish creating your apps and want to sign on to the Seller Dashboard and publish them to the Office Store, you use your individual Microsoft account (on the live.com domain) instead of the user ID that you created on your new Developer Site domain.
After you finish the signup process, your browser will open the Office 365 admin center page, as shown in Figure 2. You can download the Office 2013 client applications by clicking the Download Software link that appears under the admin shortcuts heading on the right side of the page.
Figure 2. Important links on the Office 365 admin center page

Office 365 Admin Center
You’ll have to wait for your Developer Site to finish provisioning. After provisioning is complete, refresh the admin center page in your browser. Then, click the Build Apps link in the upper left corner of the page to open your Developer Site. You should see a site that looks like the one in Figure 3. If you see a team site instead, wait a few minutes and launch your site again.
Figure 3. Your Developer Site home page

Developer Site home page


When you finish provisioning an Developer Site, you can start developing apps for Office and SharePoint in two ways: by using Visual Studio 2012 or by installing the "Napa" Office 365 Development Tools without having to install Visual Studio 2012.
"Napa" Office 365 Development Tools is a browser-based authoring tool that makes developing apps for Office and SharePoint quick and easy. You can’t use the "Napa" Office 365 Development Tools tools to create provider-hosted or autohosted apps for SharePoint, but you can use them to create SharePoint-hosted apps. And you can download the solutions that you create with the "Napa" Office 365 Development Tools and open them in Visual Studio 2012.
You can install "Napa" Office 365 Development Tools in the same way you install any other published app for SharePoint (.app) package in the Office Store.
  1. Sign on to your Office 365 Developer Site.
  2. Click the Build an App tile.
  3. On the details page of the "Napa" Office 365 Development Tools app, choose ADD IT to install the app. You might see a prompt asking you to select one of the supported languages.
  4. Choose the Continue button to confirm that you wish to add the app on the next page.
  5. After you sign in, you’ll be granted a license for the app. Leave the installation check box selected, and then click the Return to site link.
  6. Choose the Trust It button in the next window.
  7. After installation is complete, click the "Napa" Office 365 Development Tools icon on the All Site contents page to launch "Napa" Office 365 Development Tools.
Note Note
If you don’t have the Office Developer Tools for Visual Studio 2012 installed on your developer computer, those tools are installed when you choose the Open in Visual Studio button from "Napa" Office 365 Development Tools.


Wednesday, 25 December 2013

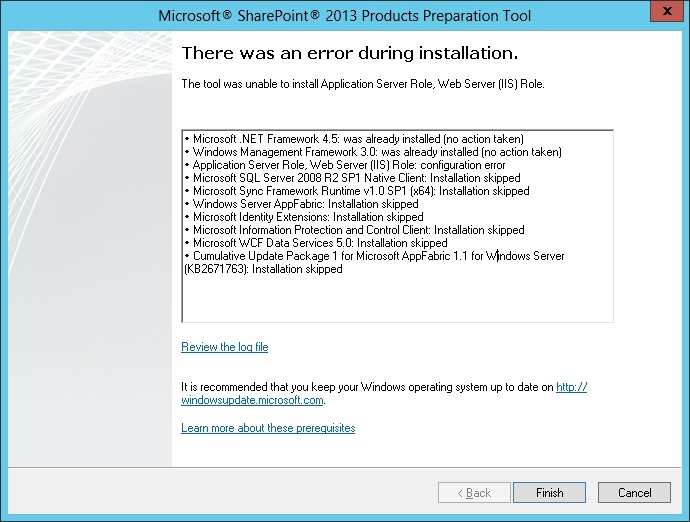
Application Server Role, Web Server (IIS) Role: configuration error


I’m installing SharePoint 2013 on Windows 2012 ‘offline’ – the server has no Internet access.  Within minutes of starting the Preparation Tool to install the prerequisites it has failed to install the Web Server (IIS) Role.
Error_During_Installation
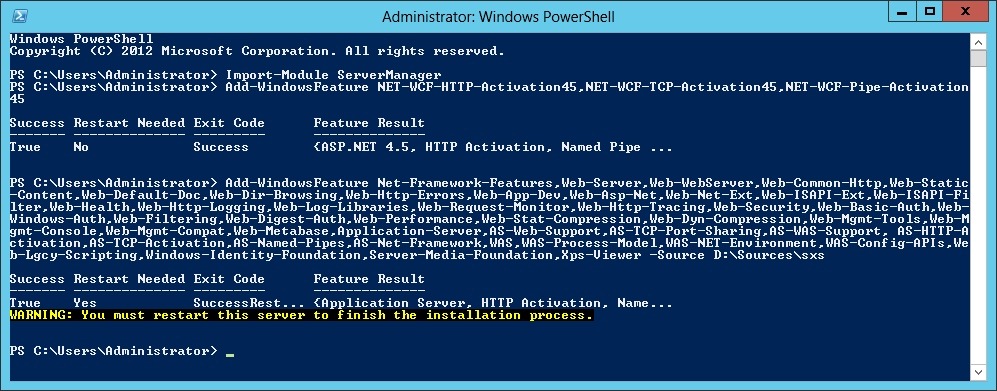
The process failed because additional files are required and the server does not have access to Windows Update.  I’ve got around this by installing the role manually using a few PowerShell commands, namely Add-WindowsFeature, specifying the Windows 2012 DVD as the installation source (the server is virtual so I have mounted the ISO image).  The commands are as follows:
Import-Module ServerManager
Add-WindowsFeature NET-WCF-HTTP-Activation45,NET-WCF-TCP-Activation45,NET-WCF-Pipe-Activation45
Add-WindowsFeature Net-Framework-Features,Web-Server,Web-WebServer,Web-Common-Http,Web-Static-Content,Web-Default-Doc,Web-Dir-Browsing,Web-Http-Errors,Web-App-Dev,Web-Asp-Net,Web-Net-Ext,Web-ISAPI-Ext,Web-ISAPI-Filter,Web-Health,Web-Http-Logging,Web-Log-Libraries,Web-Request-Monitor,Web-Http-Tracing,Web-Security,Web-Basic-Auth,Web-Windows-Auth,Web-Filtering,Web-Digest-Auth,Web-Performance,Web-Stat-Compression,Web-Dyn-Compression,Web-Mgmt-Tools,Web-Mgmt-Console,Web-Mgmt-Compat,Web-Metabase,Application-Server,AS-Web-Support,AS-TCP-Port-Sharing,AS-WAS-Support, AS-HTTP-Activation,AS-TCP-Activation,AS-Named-Pipes,AS-Net-Framework,WAS,WAS-Process-Model,WAS-NET-Environment,WAS-Config-APIs,Web-Lgcy-Scripting,Windows-Identity-Foundation,Server-Media-Foundation,Xps-Viewer -Source D:\Sources\sxs
 
PowerShell_Commands
This process took no more than a few minutes to complete.  After a quick reboot the configuration is completed.  After logging on I restarted the Preparation Tool and it completed without error.