Thursday, 20 February 2014

Enable users or groups to use personal and social features

Enable users or groups to use personal and social features

Use this procedure to configure the user permissions for personal and social features.

To enable users or groups to use personal and social features

  1. Verify that you have the following administrative credentials:
  2. In Central Administration, in the Application Management section, click Manage service applications.
  3. In the list of service applications, click User Profile Service Application.
  4. On the Manage Profile Service: User Profile Service Application page, in the People group, click Manage User Permissions.
  5. On the Permissions for User Profile Service Application page, type or select a user or group account, and then click Add.
  6. In the Permissions for box, check the feature or features that you want the user or group to be able to use, and then click OK.

Tuesday, 28 January 2014

APPs Development on Office 365

Sign up for an Office 365 Developer Site

apps for Office and SharePoint
 
 
Learn how to sign up for an Office 365 Developer Site to develop, test, and deploy apps for Office and SharePoint.
Applies to:  Office 365 | SharePoint Server 2013 | SharePoint Foundation 2013 | Visual Studio 2012 | apps for Office | apps for SharePoint 


Use an Office 365 Developer Site as a development and testing environment to shorten your setup time and start creating, testing, and deploying your apps for Office and SharePoint. Deploy the "Napa" Office 365 Development Tools to this preconfigured SharePoint site and you also get a head start on developing SharePoint-hosted apps, and apps for Office documents and mail items, without installing Visual Studio 2012 and Office Developer Tools for Visual Studio 2012 on your development computer. With an Office 365 Developer Site, you get an isolated app domain for SharePoint-hosted apps, preconfigured to use OAuth, so that you can use the Windows Azure Access Control Service (ACS) for authenticating and authorizing provider-hosted apps for SharePoint that are deployed to this site.


You may already have access to an Office 365 Developer Site. Here are three ways to get one:
Sign up for a free Office 365 Developer Subscripti
Tip Tip
We’ll open each of these links in another window or tab to keep the following instructions handy.
This customized Office 365 subscription includes all the tools and resources you need to jump in and start building apps:
  • SharePoint Online developer site, customized for creating and testing apps
  • You can install "Napa" Office 365 Development Tools, to create your first apps right within the browser
  • Office Professional Plus 2013
  • Exchange Online
During signup, you’re asked to supply a subdomain of .onmicrosoft.com and a user ID to assign to the domain that you’re creating, as shown in Figure 1. After signup, you have to use the resulting userid (in the format userid@yourdomain.onmicrosoft.com) to sign in to your portal site where you administer your account. Your SharePoint 2013 Developer Site is provisioned at your new domain: http://yourdomain.onmicrosoft.com.
Note Note
If you’re logged into another Microsoft account when you try to sign up for a developer account, you might get this message: “Sorry, that user ID you entered didn’t work. It looks like it’s not valid. Be sure you enter the user ID that your organization assigned to you. Your user ID usually looks likesomeone@example.com or someone@example.onmicrosoft.com.”
If you see this message, log out of the Microsoft account you were using and try again. If you still get the message, clear your browser cache or switch toInPrivate Browsing and then fill out the form.
Figure 1. Office 365 Developer Site domain name

Office 365 Developer Site domain
Note Note
When you finish creating your apps and want to sign on to the Seller Dashboard and publish them to the Office Store, you use your individual Microsoft account (on the live.com domain) instead of the user ID that you created on your new Developer Site domain.
After you finish the signup process, your browser will open the Office 365 admin center page, as shown in Figure 2. You can download the Office 2013 client applications by clicking the Download Software link that appears under the admin shortcuts heading on the right side of the page.
Figure 2. Important links on the Office 365 admin center page

Office 365 Admin Center
You’ll have to wait for your Developer Site to finish provisioning. After provisioning is complete, refresh the admin center page in your browser. Then, click the Build Apps link in the upper left corner of the page to open your Developer Site. You should see a site that looks like the one in Figure 3. If you see a team site instead, wait a few minutes and launch your site again.
Figure 3. Your Developer Site home page

Developer Site home page


When you finish provisioning an Developer Site, you can start developing apps for Office and SharePoint in two ways: by using Visual Studio 2012 or by installing the "Napa" Office 365 Development Tools without having to install Visual Studio 2012.
"Napa" Office 365 Development Tools is a browser-based authoring tool that makes developing apps for Office and SharePoint quick and easy. You can’t use the "Napa" Office 365 Development Tools tools to create provider-hosted or autohosted apps for SharePoint, but you can use them to create SharePoint-hosted apps. And you can download the solutions that you create with the "Napa" Office 365 Development Tools and open them in Visual Studio 2012.
You can install "Napa" Office 365 Development Tools in the same way you install any other published app for SharePoint (.app) package in the Office Store.
  1. Sign on to your Office 365 Developer Site.
  2. Click the Build an App tile.
  3. On the details page of the "Napa" Office 365 Development Tools app, choose ADD IT to install the app. You might see a prompt asking you to select one of the supported languages.
  4. Choose the Continue button to confirm that you wish to add the app on the next page.
  5. After you sign in, you’ll be granted a license for the app. Leave the installation check box selected, and then click the Return to site link.
  6. Choose the Trust It button in the next window.
  7. After installation is complete, click the "Napa" Office 365 Development Tools icon on the All Site contents page to launch "Napa" Office 365 Development Tools.
Note Note
If you don’t have the Office Developer Tools for Visual Studio 2012 installed on your developer computer, those tools are installed when you choose the Open in Visual Studio button from "Napa" Office 365 Development Tools.


Wednesday, 25 December 2013

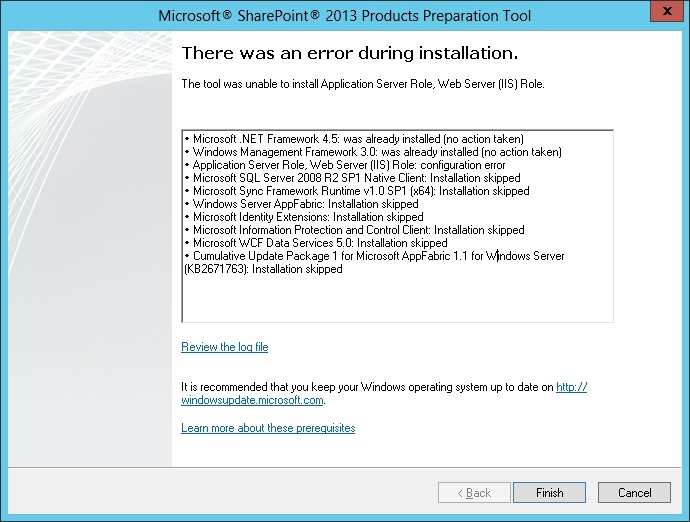
Application Server Role, Web Server (IIS) Role: configuration error


I’m installing SharePoint 2013 on Windows 2012 ‘offline’ – the server has no Internet access.  Within minutes of starting the Preparation Tool to install the prerequisites it has failed to install the Web Server (IIS) Role.
Error_During_Installation
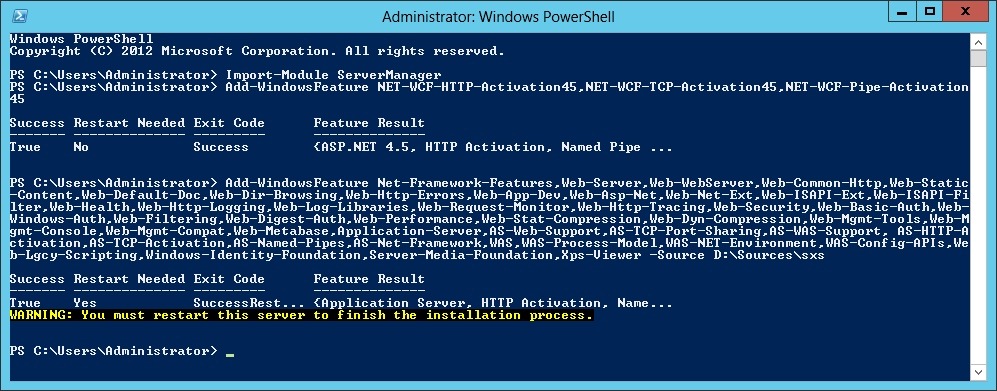
The process failed because additional files are required and the server does not have access to Windows Update.  I’ve got around this by installing the role manually using a few PowerShell commands, namely Add-WindowsFeature, specifying the Windows 2012 DVD as the installation source (the server is virtual so I have mounted the ISO image).  The commands are as follows:
Import-Module ServerManager
Add-WindowsFeature NET-WCF-HTTP-Activation45,NET-WCF-TCP-Activation45,NET-WCF-Pipe-Activation45
Add-WindowsFeature Net-Framework-Features,Web-Server,Web-WebServer,Web-Common-Http,Web-Static-Content,Web-Default-Doc,Web-Dir-Browsing,Web-Http-Errors,Web-App-Dev,Web-Asp-Net,Web-Net-Ext,Web-ISAPI-Ext,Web-ISAPI-Filter,Web-Health,Web-Http-Logging,Web-Log-Libraries,Web-Request-Monitor,Web-Http-Tracing,Web-Security,Web-Basic-Auth,Web-Windows-Auth,Web-Filtering,Web-Digest-Auth,Web-Performance,Web-Stat-Compression,Web-Dyn-Compression,Web-Mgmt-Tools,Web-Mgmt-Console,Web-Mgmt-Compat,Web-Metabase,Application-Server,AS-Web-Support,AS-TCP-Port-Sharing,AS-WAS-Support, AS-HTTP-Activation,AS-TCP-Activation,AS-Named-Pipes,AS-Net-Framework,WAS,WAS-Process-Model,WAS-NET-Environment,WAS-Config-APIs,Web-Lgcy-Scripting,Windows-Identity-Foundation,Server-Media-Foundation,Xps-Viewer -Source D:\Sources\sxs
 
PowerShell_Commands
This process took no more than a few minutes to complete.  After a quick reboot the configuration is completed.  After logging on I restarted the Preparation Tool and it completed without error.

Monday, 25 November 2013

Recently I have changed my SharePoint site Administrator password


Recently I have changed my SharePoint site Administrator password. After that whenever I try to create web application it is giving error that Administrator password is wrong.
In this post we will see a quick fix how to resolve this issue

Password Error

Following is the error which I am getting while creating a new web application


Password InCorrect Error

Fixing the problem

Update the farm credentials so that SharePoint will update the new password where ever required

 
stsadm -o updatefarmcredentials -userlogin <domain\username> -password <newpassword>

Add, Update and Delete list items using ECMAScript

Add, Update and Delete list items using ECMAScript


Introduction

In this post we will see how to Add, Update and Delete SharePoint list items with ECMAScript (aka javascript client object model)
  • Add item to SharePoint list
  • Update item of SharePoint list
  • Delete item from SharePoint list

Add item to SharePoint list

 
To add an item to the list, use the ListItemCreationInformation object,set the properties using set_item, call the update and ExecuteQueryAsync methods
1
2
3
4
5
6
7
8
9
10
11
12
13
14
15
16
17
18
19
20
21
22
23
24
    function AddListItem(){
    var ListName = "MyList";
    var context = new SP.ClientContext.get_current(); // the current context is taken by default here
    //you can also create a particular site context as follows
    //var context = new SP.ClientContext('/Sites/site1');
    var lstObject = context.get_web().get_lists().getByTitle(ListName);
    var listItemCreationInfo = new SP.ListItemCreationInformation();
    var newItem = lstObject.addItem(listItemCreationInfo);
    newItem.set_item('Title', 'This is new item');
    // set values to other columns of the list here
    newItem.update();
    context.executeQueryAsync(Function.createDelegate(this, this.onSuccess),
        Function.createDelegate(this, this.onFailure));
 
     function onSuccess() {
 
        alert('Item created: ' + newItem.get_id());
    }
 
    function onFailure(sender, args) {
 
        alert('Request failed. ' + args.get_message() + '\n' + args.get_stackTrace());
    }
}

Update Item of SharePoint list

function UpdateListItem()
{
var ListName = "MyList";
var context = new SP.ClientContext.get_current(); // the current context is taken by default here
//you can also create a particular site context as follows
//var context = new SP.ClientContext('/Sites/site1');
 
var lstObject = context.get_web().get_lists().getByTitle(ListName);
this.lstObjectItem = lstObject.getItemById(1);
lstObjectItem.set_item('Title', 'This is updated item');
lstObjectItem.update();
lstObject.set_description("Updated description using ECMAScript");
lstObject.update();
context.executeQueryAsync(Function.createDelegate(this, this.onSuccess),
Function.createDelegate(this, this.onFailure));
}
 
function onSuccess() {
alert('Item udated');
}
 
function onFailure(sender, args) {
alert('Request failed. ' + args.get_message() + '\n' + args.get_stackTrace());
}


Delete Item from SharePoint list

function DeleteListItem()
{
var ListName = "MyList";
var context = new SP.ClientContext.get_current(); // the current context is taken by default here
//you can also create a particular site context as follows
//var context = new SP.ClientContext('/Sites/site1');
 
var lstObject = context.get_web().get_lists().getByTitle(ListName);
this.lstObjectItem = lstObject.getItemById(1);
lstObjectItem.deleteObject();
 
context.executeQueryAsync(Function.createDelegate(this, this.onSuccess),
Function.createDelegate(this, this.onFailure));
}
 
function onSuccess() {
alert('Item Deleted');
}
 
function onFailure(sender, args) {
alert('Request failed. ' + args.get_message() + '\n' + args.get_stackTrace());
}


Move Files of SharePoint Document Library using Object Model

Move Files of SharePoint Document Library using Object Model


Introduction

In this post we will see how to move files of SharePoint document library to one location to another using object model.
We will also see how to keep same file Version, Modified and Modified By values after moving
The post includes
  • Generic method to move file to destination
  • Keeping the file version, Modified and Modified By without any change.

Move file

1
2
3
4
5
6
7
8
9
10
11
12
13
14
15
16
17
18
19
20
21
22
23
24
25
26
27
28
29
30
31
32
33
34
35
36
string siteUrl = "http://sharepoint-devsite.com/DevSite";
string fileName = "ProjectPlan.docx";
string sourceDirectory = "/DevSite/Shared Documents";
string destinationDirectory  = "/DevSite/ProjectDocs/ProjTeam/DevTeam/TechLead";
using (SPSite currSite = new SPSite(siteUrl))
{
    using (SPWeb currWeb = currSite.OpenWeb())
    {
        MoveFile(currWeb, destinationDirectory, sourceDirectory, fileName);
    }
}
 
public void MoveFile(SPWeb sourceWeb, string sourceDirectory, string destinationDirectory, string fileName)
{
    SPFile sourcefile = sourceWeb.GetFile(sourceDirectory + "/" + fileName);
    if (sourcefile.Exists)
    {
        object modifiedOn = sourcefile.Item["Modified"];
        object modifiedBy = sourcefile.Item["Modified By"];
 
        //true - replace if file exists
        sourcefile.MoveTo(destinationDirectory + "/" + fileName, true);  
 
        SPFile dstFile = sourceWeb.GetFile(destinationDirectory + "/" + fileName);
        SPListItem dstItem = (SPListItem)dstFile.Item;
        dstItem.ParentList.Fields["Modified"].ReadOnlyField = false;
        dstItem.ParentList.Fields["Modified By"].ReadOnlyField = false;
        dstItem["Modified"] = modifiedOn;
        dstItem["Modified By"] = modifiedBy;
        //updates the item without creating another version of the item
        dstItem.UpdateOverwriteVersion();
        dstItem.ParentList.Fields["Modified"].ReadOnlyField = true;
        dstItem.ParentList.Fields["Modified By"].ReadOnlyField = true;
    }
 
}


MoveFile is the method which moves the file to destination without changing ‘Modified’ and ‘Modified By’ values.

Move Folders of SharePoint Document Library using object model

Move Folders of SharePoint Document Library using object model


Introduction

SharePoint does not support moving folders directly but in this post we will see how we can achieve move folders of SharePoint document library to one location to another using object model.
We will also see how to keep same folder Version, Modified and Modified By values after moving
The post includes.
  • Moving folder along with subfolders from source to destination
  • Moving folder along with its items
  • Creation of folder
  • Deleting of folder

Skill Level – Medium


Move folder

Object model has MoveTo option on Folder object but that will not move the folder. From UI if we check Content and structure we will get move option on the file but
move option will be in disabled state on the folder.


Below code uses ‘MoveFolder’ method to move folder from source to destination. The method uses internally other methods to move all the subfolders and items.
Source folder ‘DevTeam’ is located in ‘Shared Documents’ Documents Libary
‘DevTeam’ folder should be moved to ‘ProjTeam’ folder under ‘ProjectDocs’ Documents Library. ‘ProjTeam’ is our destination folder.

1
2
3
4
5
6
7
8
9
10
11
12
13
14
15
16
17
18
19
20
21
22
23
24
25
26
27
28
29
30
31
32
33
34
35
36
37
38
39
40
41
42
43
44
45
46
47
48
49
50
51
52
53
54
55
56
57
58
59
60
61
62
63
64
65
66
67
68
69
70
71
72
73
74
75
76
77
78
79
80
81
82
83
84
85
86
87
88
89
90
91
92
93
94
95
96
97
98
99
100
101
102
103
104
105
106
107
string siteUrl = "http://sharepoint-devsite.com/DevSiteA";
string sourceDirectory = "/DevSiteA/Shared Documents/DevTeam";
string destinationDirectory = "/DevSiteA/ProjectDocs/ProjTeam";
 
using (SPSite currSite = new SPSite(siteUrl))
{
    using (SPWeb currWeb = currSite.OpenWeb())
    {
        MoveFolder(currWeb, sourceDirectory, destinationDirectory);
    }
}
 
//Move all folders and subfolder
public void MoveFolder(SPWeb sourceWeb, string sourceDirectory, string destinationDirectory)
{
    SPFolder srcFolder  = sourceWeb.GetFolder(sourceDirectory);
    if (srcFolder.Exists)
    {
        SPDocumentLibrary docLib = srcFolder.DocumentLibrary;
        SPFolderCollection oFolder = srcFolder.SubFolders;
        SPQuery oQuery = new SPQuery();
        oQuery.Query = "<Where><Eq><FieldRef Name='FSObjType'/><Value Type='Lookup'>1</Value></Eq></Where>";
        oQuery.Folder = oFolder.Folder;
        oQuery.ViewAttributes = "Scope='RecursiveAll'";
        SPListItemCollection collListItems = docLib.GetItems(oQuery);
        string newdestinationFolderPath = destinationDirectory;
        //Move the root folder with files
        MoveSingleFolder(sourceWeb, sourceDirectory, newdestinationFolderPath);
 
        newdestinationFolderPath = destinationDirectory + "/" + srcFolder.Name;
        //Move the subfolders with files
        foreach (SPListItem item in collListItems)
        {
            MoveSingleFolder(sourceWeb, item.Url, newdestinationFolderPath);
        }
        // Delete the root folder
        DeleteSourceFolder(sourceWeb, sourceDirectory);
    }
 
}
 
//Move single folder
private void MoveSingleFolder(SPWeb srcWeb, string sourceFolderPath, string destinationFolderPath)
{
    SPFolder srcFolder = srcWeb.GetFolder(sourceFolderPath);
    if (srcFolder.Exists)
    {
        string srcFolderName = srcFolder.Name;
        SPFolder dstFolder = srcWeb.GetFolder(destinationFolderPath);
        if (dstFolder.Exists)
        {
            //create the folder
            SPFolder newFolder = dstFolder.SubFolders.Add(srcFolderName);
                SPListItem newFolderItem = (SPListItem)newFolder.Item;
                newFolderItem.ParentList.Fields[SPBuiltInFieldId.Modified].ReadOnlyField = false;
                newFolderItem.ParentList.Fields[SPBuiltInFieldId.Modified_x0020_By].ReadOnlyField = false;
                newFolderItem[SPBuiltInFieldId.Modified] = srcFolder.Item["Modified"];
                newFolderItem["Modified By"] = srcFolder.Item["Modified By"];
                newFolderItem.UpdateOverwriteVersion();
                newFolderItem.ParentList.Fields[SPBuiltInFieldId.Modified].ReadOnlyField = true;
                newFolderItem.ParentList.Fields[SPBuiltInFieldId.Modified_x0020_By].ReadOnlyField = true;
 
        }
        MoveFolderItems(srcWeb, sourceFolderPath, destinationFolderPath + "/" + srcFolderName);
    }
}
 
//Move folder items
private void MoveFolderItems(SPWeb sourceWeb, string sourceFolderPath, string destinationFolderPath)
{
    SPFolder srcFolder = sourceWeb.GetFolder(sourceFolderPath);
    int fileCount = srcFolder.Files.Count;
    while (fileCount > 0)
    {
        SPFile sourceFile = sourceWeb.GetFile(srcFolder.Files[0].Url);
        object modifiedOn = sourceFile.Item["Modified"];
        object modifiedBy = sourceFile.Item["Modified By"];
 
        sourceFile.MoveTo(destinationFolderPath + "/" + sourceFile.Name, true);
 
        fileCount--;
 
        SPListItem dstItem = (SPListItem)sourceFile.Item;
        dstItem.ParentList.Fields["Modified"].ReadOnlyField = false;
        dstItem.ParentList.Fields["Modified By"].ReadOnlyField = false;
        dstItem["Modified"] = modifiedOn;
        dstItem["Modified By"] = modifiedBy;
        dstItem.UpdateOverwriteVersion(); //updates the item without creating another version of the item
        dstItem.ParentList.Fields["Modified"].ReadOnlyField = true;
        dstItem.ParentList.Fields["Modified By"].ReadOnlyField = true;
    }
}
 
//Delete the folder
private void DeleteSourceFolder(SPWeb srcWeb, string sourceFolderPath)
{
    SPFolder srcFolder = srcWeb.GetFolder(sourceFolderPath);
    if (srcFolder.Exists)
    {
        if (srcFolder.Files.Count == 0) //Delete only after moving
        {
            SPFolder srcRootFolder = srcFolder.ParentFolder;
            srcRootFolder.SubFolders.Delete(srcFolder.Url);
        }
    }
 
}

Move Folder creates folder, moves items to it. It will then creates all the subfolders and moves items to each subfolder from the source. After moving is done the source folder is deleted. Version along with ‘Modified’ and ‘Modified By’ values will be same as the source.

Before Moving

Source Folder


After Moving
Destination Folder

Conclusion

Moving folders along with subfolders is a requirement which cannot be done directly from UI or from object model. Hope this code helps when required.