Introduction
There are a lot of ASP.NET web developers who are moving to SharePoint site creation. This article will explain in detail how an ASP.NET webpage developed in Visual Studio can be converted into a SharePoint site. If there is a requirement for a website created in Visual Studio, just the old fashioned way with the code-behind logic and other layers like Data Access and Business Logic, to be converted into a SharePoint site, and still make it work the same way with the same code-behind, you are in the right place. This article deals with right that.Scenario
There is an ASP.NET website solution that contains three layers viz. Code-Behind Layer, Business-Logic Layer, and the Data-Access Layer. The website has functionality implemented in all these layers. The Business-Logic and the Data-Access layers are in a different Class Library project. We have to convert this website into a SharePoint site. Also, we want to use the same look and feel of the SharePoint site. So, we have to use the SharePoint master page instead of the one that we are having (we can also use our own master page; just that you have to add some default Place Holders that are required for the SharePoint functionalities). In this article, we are dealing with a website with the same look and feel as a SharePoint site.Steps Overview
There are three steps that are explained in the article which will help you to transform your ASP.NET Web Application into a SharePoint site.Step1: Add a Web Deployment Project to your website solution that will create a single DLL for the website. This step will give us the code-behind DLL and other dependency DLLs for the website.
Step2: Copy the bin folder items (DLLs) into the SharePoint site, and tweak the web configuration file of the SharePoint site to use the copied DLLs.
Step3: Open your created SharePoint site in SharePoint Designer and import the web pages from our web application and link it to the appropriate DLLs.
Step 1: Adding a web deployment project to your website solution that will create a single DLL for the website
- The first step is to make sure you have added the proper namespaces and avoided class name duplications within a namespace before going to step 2.
- Add a web deployment project into your website solution. This can be done by right clicking on the website project and choosing 'Add Web Deployment Project' option. Note: This option will be available once you have installed the Web Deployment Setup.
- Add a strong name key to the solution which we will be using to sign all the DLLs.
- Now, we have to set the deployment project properties. Right-click on the deployment project and click 'Property Pages'.
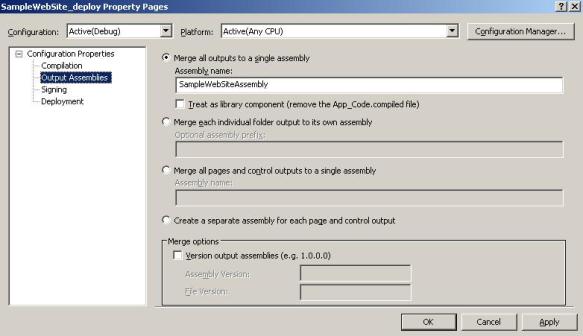
- Go to the 'Output Assemblies' tab, and choose the 'Merge all assemblies to single assembly' option (this is the default option), and give the assembly name.
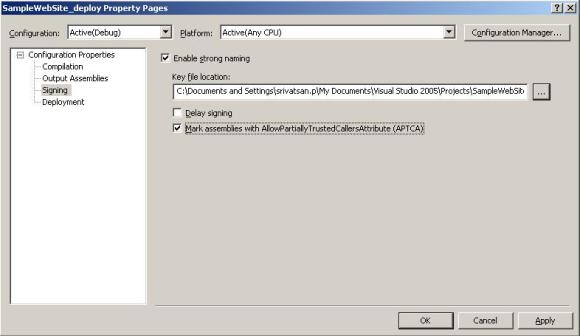
- Next, go to the Signing tab and choose the 'Enable strong naming' option, and choose the strong name key that you have created in step 3.
- Also check the option 'Mark the assemblies with AllowPartiallyTrustedCallersAttribute (APTCA)'. This will make the DLL partially trusted, and thus the SharePoint site can use them. Click on OK.
- The Data Access, Business Logic, or any other assemblies that are a dependency to the web application must be strong named with a strong name key.
- Also, we have to allow partially trusted callers for the dependency DLLs. This can be done by opening the Assembly.info file of the Class Library project and putting the following line of code as shown above:
- Build the deployment project under Release mode (any mode).
- Go to the path where the deployment project has put the output. Here, in the bin directory, you will find the web deployment DLL file. If there are any dependency projects such as the Business Layer and the Data-Access Layer, those DLLs also will be copied to this bin folder.
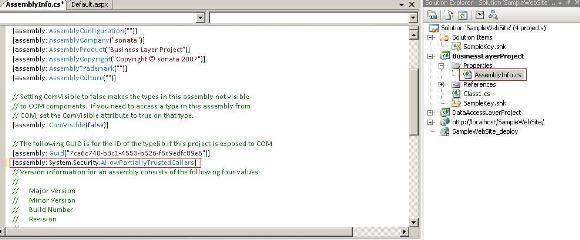
[assembly: System.Security.AllowPartiallyTrustedCallers]
Step 2: Copy the bin folder items (DLLs) into the SharePoint site and tweak the web configuration file of the SharePoint site to use the copied DLLs
The next step in our SharePoint site creation is linking the DLLs that we have created in the procedure above into our already existing blank SharePoint site. There are also some changes that are required in our SharePoint site's web.config file (By default found in C:\Inetpub\wwwroot\wss\VirtualDirectories\<PortNo>). Following are the steps that has to be done:- Copy the bin folder contents from your ASP.NET deployment folder into the bin folder of your SharePoint site (usually in C:\Inetpub\wwwroot\wss\VirtualDirectories\<PortNo>\bin).
- Open the web.config file of your SharePoint site.
- Add the following line in under the
<PageParserPath>section: - Register the assemblies that will be used in the SharePoint site (web deployment DLL which has the code-behind code, the Business Layer and Data Access DLLs) as a SafeControl. For this, add the following under the
<SafeControls>section: - Also add all the other dependency DLLs that your site will be using. Note that all these DLLs must be strong named and marked
AllowPartiallyTrusted. - Change the trust level from Minimal to Medium by changing the
levelattribute of the<trust>section from 'WSS_Minimal' to 'WSS_Medium'.
Note: You can also do the following to enable the original errors being shown in the SharePoint site screen for easy error identification. You have to change the
<PageParserPath VirtualPath="/*" CompilationMode="Always"
   AllowServerSideScript="true" IncludeSubFolders="true" />
<SafeControl Assembly="SampleWebSiteAssembly"
   Namespace="SampleSiteNamespace" TypeName="*" Safe="True" />
mode attribute of the <customErrors> section to Off. Also, change the CallStack attribute of the <SafeMode> section to True.Step 3: Open your created SharePoint site in SharePoint Designer and import the web pages from our web application
Let us say we have a link in our SharePoint site in the left navigation panel, on the click of which you want to display one of your ASP.NET pages in the content place holder of the SharePoint site. This is what we do:- Open your SharePoint site in the SharePoint Designer (in this article, we are using SharePoint Designer 2007).
- Click on File-->Import-->File. This will open the Import dialog box.
- Click on 'Add File' and choose the ASPX page that you have created from your local folder. Please note that you have to take the ASPX file from the deployment folder and not the ASPX page that is there in the project. Click OK. This will import the page into your SharePoint site.
- Now, double-click on the newly imported page. Click on the Split option in the Design/Split/Code option in the centre pane (bottom left of the pane).
- As soon as you do this, you will see in the designer window an error that says: The Master Page file cannot be loaded. This is because the master file that we have used in the project is different from the master page that the SharePoint site uses. You can either import the master page or use SharePoint's default master page. In this article, we are going to use SharePoint's default master page.
- Change the '
MasterPageFile' attribute in thePagedirective of the web page to a value same as the default.aspx in the SharePoint site, which is ~masterurl/default.master. - Delete the '
CodeFile' attribute from thePagedirective as this is only for Visual Studio purposes. - Now, change the
ContentPlaceHolderIDof the place holders in the ASP.NET page to a relevant SharePoint site place holder. For example, theContenPlaceHolderIDof the main content place holder of the ASP.NET page must be changed to 'PlaceHolderMain'. - After mapping the place holders of the ASP.NET page to that of the SharePoint master page, the page will render in the design view with the default master page.
- Now, we have to change the
Inheritsattribute to add the assembly name. For example, if the namespace is 'SampleSiteNamespace' and the assembly name that the page uses for code-behind is SampleWebSiteAssembly, then we setInherits="SampleSiteNamespace.SampleWebSiteAssembly", and this assembly must be in the bin of the SharePoint site as added in Step 2 above.
License
This article, along with any associated source code and files, is licensed under The Code Project Open License (CPOL)