SharePoint 2013 Online App Development Using with Napa tool
1. Register with the Cloud based Office online 365.
An App for Office is essentially a webpage that is hosted inside an Office client/web application. You can use Apps to extend the functionality of a document, email message, meeting request, or appointment. Apps can run in multiple environments and clients, including Office desktop clients, Office Web Apps, mobile browsers, and also on-premises and in the cloud.
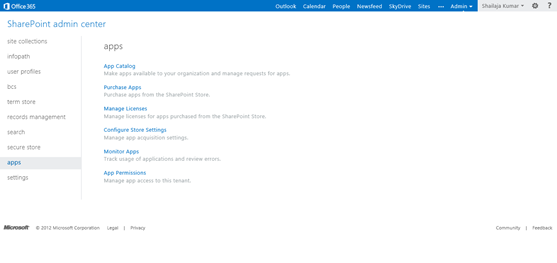
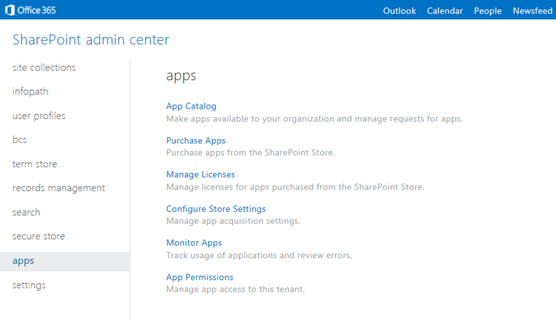
The following is the SharePoint Administration Center control for managing Apps in Microsoft Office 365 – SharePoint 2013 Online.
Apps have a light imprint because they don't actually install on the host server, and that means they don't overload a SharePoint site with unnecessary API calls.
Cloud App Model offers users to discover and download apps from the SharePoint Store or from their organization's private App Catalog and install them on their SharePoint sites.
Here we’re going to focus on "Napa" Office 365 Development Tools in detail. We will see how to create, manage and deployments are supported in the Napa Office 365 Development Tools.
To get started with Apps development for the Office 365 – SharePoint 2013, login to the Office 365. After successful login, the next page will be Office 365 admin center; in the same page you can find the developer site navigation where you get Napa development tools.
Another option is navigate to the SharePoint 2013 administration center and under the site collection list, you can find the developer site collection URL.
The following screen capture image will help you to navigate to the SharePoint Administrator center.

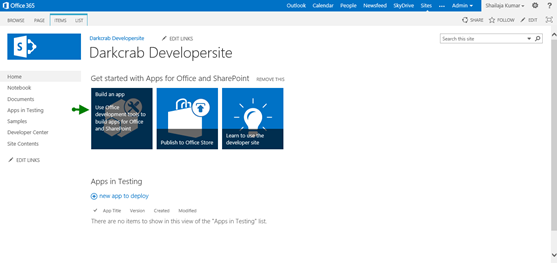
Once you navigated to the SharePoint Administrator Center, you see the developer site collection. Login to the developer site collection and you can see the navigation for the Napa tool download.
The following is the navigation for the Napa tool download available in the home page of the developer site.
Then you will be navigated to the Office apps store download site of the download.
Following is the step by step process of installing the Napa development tool to your environment.

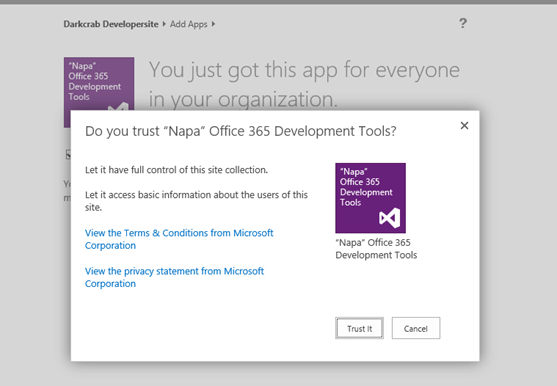
This will be added to the trusted list of service in the browser (preferably Microsoft Internet Explorer 9 or later version)
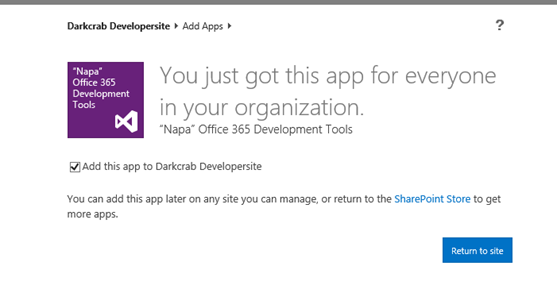
License of the office app will be managed under the login in which we have downloaded.
Here it is App Part, not replacement for WebPart. An App Part is essentially a wrapper for an
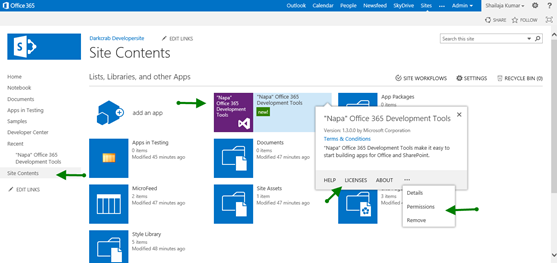
We can manage permission levels and license management for Napa app as well as all apps installed in the site.
Now let’s take a look at a simple example for how to create an app to show from Office 365 – SharePoint 2013 pages. Let’s start exploring the App development using Napa and in the later part of this chapter, we will see more logical examples.
Click on the Napa and the following page will appear for selecting the name for the app.
The following is the default project generated using Napa, which is powered by Visual Studio 2012.
By default, App solution is generated with four folders and each folder contains related app files. First the content folder which contains the App.css file, Images folder contains the Appicon.png file, Pages folder contains the ClientWebPart.aspx and Default.aspx and Scripts folder contains the Apps.js file.
Apart from the default files, as per the development needs, we can add new files to our App development. Right click on the folder under which you need to add file. The support files to add to our existing solution are JavaScript file, Style Sheet and SharePoint Web page.
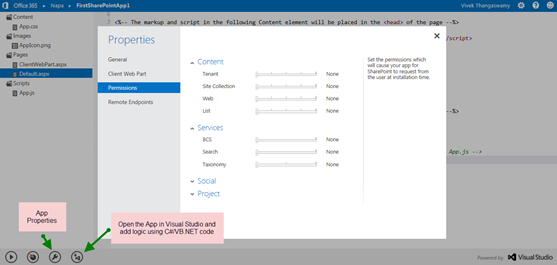
App properties can be defined in the properties windows, where you can define the name, permission, access and remote endpoints.
Open the Default.aspx file under the Pages folder and add HTML tag to create a dropdown list. Here in this example, we have created dropdown list in the name ‘
Now we need to write JavaScript to retrieve the list names from the current app running context and populate the list names in the dropdown list. Open the file named App.js under the folder name Scripts.
The following is code which will be generated while creating the project using the Napa tool. Each part code is explained with comments to understand the purpose of its existence.
Now let’s see the code to retrieve the list/library names from the current context of the web and populate the same in the dropdown list. We will write a
And now, click on the Run Project button; appear near the status bar of the Internet Explorer.
1. Register with the Cloud based Office online 365.
Table of Contents
- Apps
- Developer Site Settings
- ‘Napa’ Office 365 Development Tools
- Using Napa Office 365 Development Tools
- Using Visual Studio 2012
Apps
Apps are new type of solution that help to extend Microsoft Office 2013 product features to fulfill business demands. The new Office solution type Apps for Office are built on web technologies like HTML, CSS, JavaScript, REST, etc. The Office Apps solutions will be supported in Microsoft Excel Web App, Microsoft Outlook 2013, Microsoft Outlook Web App, Microsoft Project Professional 2013, Microsoft Word 2013, Microsoft Excel 2013, Microsoft SharePoint 2013 and Microsoft Exchange 2013.An App for Office is essentially a webpage that is hosted inside an Office client/web application. You can use Apps to extend the functionality of a document, email message, meeting request, or appointment. Apps can run in multiple environments and clients, including Office desktop clients, Office Web Apps, mobile browsers, and also on-premises and in the cloud.
The following is the SharePoint Administration Center control for managing Apps in Microsoft Office 365 – SharePoint 2013 Online.
Apps Building Blocks
The basic components of an App for Office are XML manifest file and webpage. The manifest defines configuration, settings and points to the webpage that implements the App UI and custom business logic.App Types and Extensibility
App is classified as four main categories and each category of app will support its corresponding Office products.- App for SharePoint
- Task pane App for Office
- Content App for Excel
- Mail App for Office
App for SharePoint
SharePoint 2013 presents a Cloud App Model that facilitates you to create apps. Apps for SharePoint are self-contained sections of functionalities using standards-based technologies such as HTML5, JavaScript, and OAuth that extend the capabilities of a SharePoint website.Apps have a light imprint because they don't actually install on the host server, and that means they don't overload a SharePoint site with unnecessary API calls.
Cloud App Model offers users to discover and download apps from the SharePoint Store or from their organization's private App Catalog and install them on their SharePoint sites.
‘Napa’ Office 365 Development Tools
Here we’re going to focus on "Napa" Office 365 Development Tools in detail. We will see how to create, manage and deployments are supported in the Napa Office 365 Development Tools.
To get started with Apps development for the Office 365 – SharePoint 2013, login to the Office 365. After successful login, the next page will be Office 365 admin center; in the same page you can find the developer site navigation where you get Napa development tools.
Another option is navigate to the SharePoint 2013 administration center and under the site collection list, you can find the developer site collection URL.
The following screen capture image will help you to navigate to the SharePoint Administrator center.
Once you navigated to the SharePoint Administrator Center, you see the developer site collection. Login to the developer site collection and you can see the navigation for the Napa tool download.
The following is the navigation for the Napa tool download available in the home page of the developer site.
Then you will be navigated to the Office apps store download site of the download.
Following is the step by step process of installing the Napa development tool to your environment.
This will be added to the trusted list of service in the browser (preferably Microsoft Internet Explorer 9 or later version)
License of the office app will be managed under the login in which we have downloaded.
Image Title Name
App Part
What is an App Part? It is a type of Web Part that is represented by theClientWebPart class. In a way by which an App for SharePoint 2013 can be appeared is through an App part. App Part, now in some of your minds will raise a question - is this replacement for WebPart? If not, what is the difference over WebPart and does it comes with any advantages. Here it is App Part, not replacement for WebPart. An App Part is essentially a wrapper for an
IFrame that would host a page of the App. In addition to acting as a Wrapper, like a WebPart, an App part can have custom properties that users can set in a tool part. - ClientWebPart.aspx - In a SharePoint Hosted App, this will act as your App Part Interface.
- Default.aspx - is the start page for the App. This will provide the full page App experience, which will be the landing page after the deployment of the App.
- App.css – This will contain the default styling and based on the requirement, we can use the same CSS file to add any custom styles.
- App.js – In this JavaScript file, it contains the required JavaScript and has few lines of pre-generated code to start your SharePoint App development.
Using ‘Napa’ Office 365 Development Tools
Once after installing the Napa development tool in your development environment, go to the developer site and under the site content section, you find the installed apps. We can manage permission levels and license management for Napa app as well as all apps installed in the site.
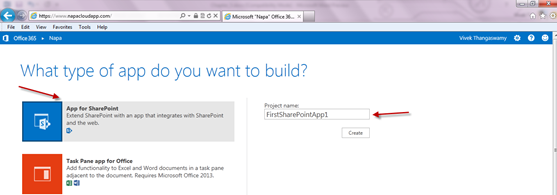
Now let’s take a look at a simple example for how to create an app to show from Office 365 – SharePoint 2013 pages. Let’s start exploring the App development using Napa and in the later part of this chapter, we will see more logical examples.
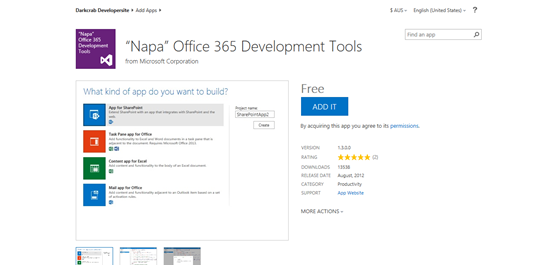
Click on the Napa and the following page will appear for selecting the name for the app.
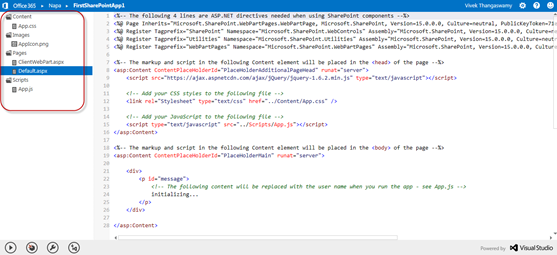
The following is the default project generated using Napa, which is powered by Visual Studio 2012.
By default, App solution is generated with four folders and each folder contains related app files. First the content folder which contains the App.css file, Images folder contains the Appicon.png file, Pages folder contains the ClientWebPart.aspx and Default.aspx and Scripts folder contains the Apps.js file.
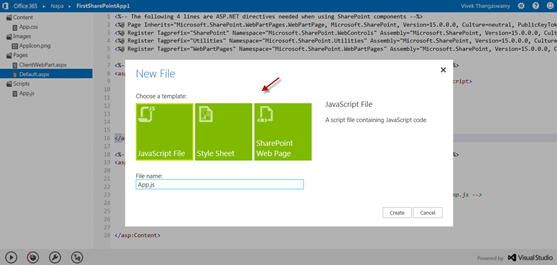
Apart from the default files, as per the development needs, we can add new files to our App development. Right click on the folder under which you need to add file. The support files to add to our existing solution are JavaScript file, Style Sheet and SharePoint Web page.
App properties can be defined in the properties windows, where you can define the name, permission, access and remote endpoints.
Creating App using Napa
- Open the SharePoint Admin Center
- Under the site collection, open the developer site.
- Open the "Napa" Office 365 Development Tools from the developer Site Collection.
- Now you will be navigated to https://www.napacloudapp.com/.
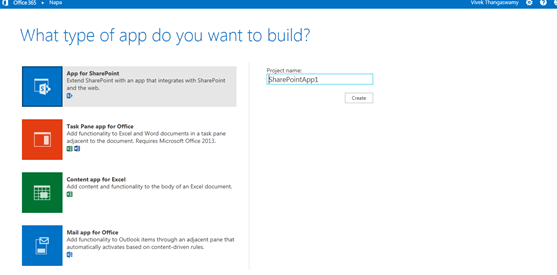
- In the following page, you can see “What type of app do you want to build?” with App for SharePoint, Task pane App for Office, Content App for Excel and Mail App for Office project options.
- Enter the project name and click Create.
- ClientWebPart.aspx
- Default.aspx
- App.css
- App.js
- AppIcon.png
Open the Default.aspx file under the Pages folder and add HTML tag to create a dropdown list. Here in this example, we have created dropdown list in the name ‘
ListItemListBox’. <asp:Content ContentPlaceHolderId="PlaceHolderMain" runat="server">
<div>
<select id="ListItemListBox"></select>
</div>
</asp:Content>
The following is code which will be generated while creating the project using the Napa tool. Each part code is explained with comments to understand the purpose of its existence.
var context;
var web;
var user;

// This code runs when the DOM is ready. It ensures the SharePoint
// script file sp.js is loaded and then executes sharePointReady()
$(document).ready(function () {
    SP.SOD.executeFunc('sp.js', 'SP.ClientContext', sharePointReady);
});

// This function creates a context object which is needed to use the SharePoint object model
function sharePointReady() {
    context = new SP.ClientContext.get_current();
    web = context.get_web();

    getUserName();
}

// This function prepares, loads, and then executes a SharePoint query to get the
// current users information
function getUserName() {
    user = web.get_currentUser();
    context.load(user);
    context.executeQueryAsync(onGetUserNameSuccess, onGetUserNameFail);
}

// This function is executed if the above call is successful
// It replaces the contents of the 'helloString' element with the user name
function onGetUserNameSuccess() {
    $('#message').text('Hello ' + user.get_title());
}

// This function is executed if the above call fails
function onGetUserNameFail(sender, args) {
    alert('Failed to get user name. Error:' + args.get_message());
}
GetListsToDisplay() which get the list/library name loaded from context and on the successful retrieval from the context, the following function will populate to the dropdown list for display. If the loading fail, the GetListsToDisplayFail(sender, args) will display the error message. function GetListsToDisplay() {
// Get the available SharePoint lists, and then set them into
// the context.
this.web = context.get_web();
this.lists = this.web.get_lists();
this.context.load(this.lists);
this.context.executeQueryAsync(Function.createDelegate
(this, this.GetListsToDisplaySucess),
Function.createDelegate(this, this.GetListsToDisplayFail));
}
function GetListsToDisplaySucess(sender, args) {
// Success getting the lists. Set references to the list
// elements and the list of available lists.
var listEnumerator = this.lists.getEnumerator();
var selectListBox = document.getElementById("ListItemListBox");
if (selectListBox.hasChildNodes()) {
while (selectListBox.childNodes.length >= 1) {
selectListBox.removeChild(selectListBox.firstChild);
}
}
// Traverse the elements of the collection, and load the name of
// each list into the dropdown list box.
while (listEnumerator.moveNext()) {
var selectOption = document.createElement("option");
selectOption.value = listEnumerator.get_current().get_title();
selectOption.innerText = listEnumerator.get_current().get_title();
selectListBox.appendChild(selectOption);
}
}
function GetListsToDisplayFail(sender, args) {
// Lists couldn’t be loaded - display error.
alert('failed to get list. Error:' + args.get_message());
}
No comments:
Post a Comment