Start Workflow from Custom Timer Job
In this post, i will try to explain how to start a Workflow from Custom Timer Job in Sharepoint 2010. I will like to thank Mr. Andrew Connell whose blog:http://www.andrewconnell.com/Creating-Custom-SharePoint-Timer-Jobs helped me alot in the process of creating timer job. I would like to thank Mr. Ahmed Naji also. His bloghttp://dotnetfinder.wordpress.com/2010/07/24/creatingcustomsharepointtimerjob2010/ also helped me alot. It was hard for me to find working timer job that will start workflow. After a week of googling and working around, i figured out the way to do it.
Now lets start building the timer job.
First of all design the workflow in sharepoint designer and publish it to the desired list/library.
Then fire up the visual Studio.
Open Visual Studio 2010
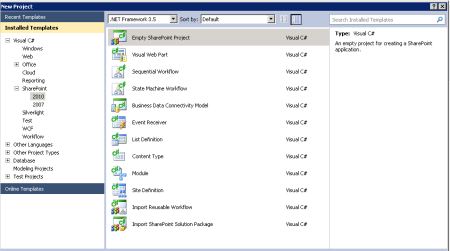
Click on File and New then Project then Select Sharepoint 2010 on the left side and Select Empty Sharepoint Project. Name it whatever you want. In my case i had named it: Custom_TimerJobToStartWorkflow
Then fire up the visual Studio.
Open Visual Studio 2010
Click on File and New then Project then Select Sharepoint 2010 on the left side and Select Empty Sharepoint Project. Name it whatever you want. In my case i had named it: Custom_TimerJobToStartWorkflow
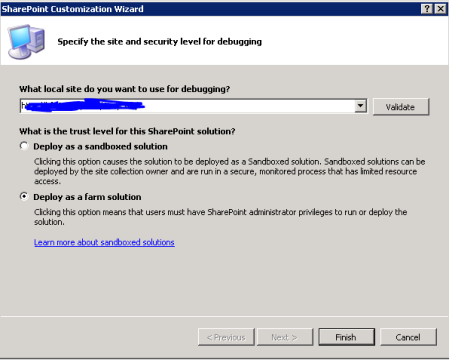
Deploy it as a farm Solution.
Now Create a class in the project. Right Click on the Project Name and Select Add then Click on New Item.
Name the class whatever you want. In my case i named it StartWorkflow.cs
Name the class whatever you want. In my case i named it StartWorkflow.cs
In StartWorkflow.cs add using Microsoft.SharePoint.Administration;
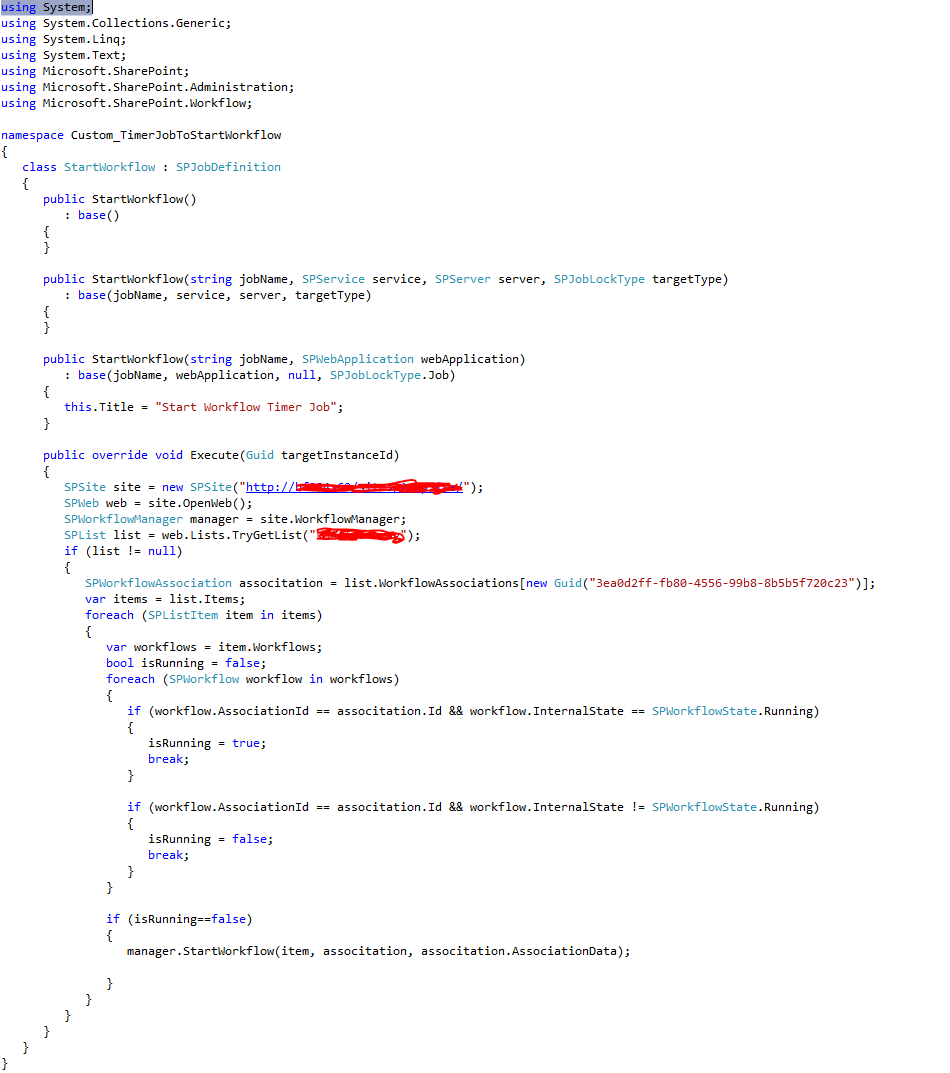
In this class you will need to create a few constructors and override the Execute() method as shown below:
I guess some explanations are needed over here:
Remember i asked you to design and publish the workflow first. It is beacuse, we will need the GUID of that particular workflow that we want to start. In the code you can see that we are using GUID. To get the GUID of the workflow, go back to the list where the workflow is created. In the Ribbon, Library Tools, Documents tab, click “Workflows”. In the “Start a New Workflow” section, right-click on the url that has the name of your workflow and select “Copy Shortcut”. For Example:
Look at the Url and extract the Guid from the TemplateId parameter. For example, in this url:
http://mysharepointsite/_layouts/IniWrkflIP.aspx?List={21303f3e-d36c-40f2-806e-0d2536b4ec72}&ID=4&TemplateID={aed94889-39bc-4eb9-997b-302d0f55c645}&Source=http://mysharepointsite /
The GUID that is bold above is the GUID of the workflow.
Now, this job will start the workflow everytime it is executed.
In this class you will need to create a few constructors and override the Execute() method as shown below:

I guess some explanations are needed over here:
Remember i asked you to design and publish the workflow first. It is beacuse, we will need the GUID of that particular workflow that we want to start. In the code you can see that we are using GUID. To get the GUID of the workflow, go back to the list where the workflow is created. In the Ribbon, Library Tools, Documents tab, click “Workflows”. In the “Start a New Workflow” section, right-click on the url that has the name of your workflow and select “Copy Shortcut”. For Example:
Look at the Url and extract the Guid from the TemplateId parameter. For example, in this url:
http://mysharepointsite/_layouts/IniWrkflIP.aspx?List={21303f3e-d36c-40f2-806e-0d2536b4ec72}&ID=4&TemplateID={aed94889-39bc-4eb9-997b-302d0f55c645}&Source=http://mysharepointsite /
The GUID that is bold above is the GUID of the workflow.
Now, this job will start the workflow everytime it is executed.
Now, next step is to add the feature.
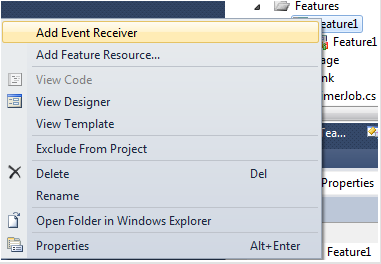
Right Click on Features in Solution Explorer window and Click on Add Feature.
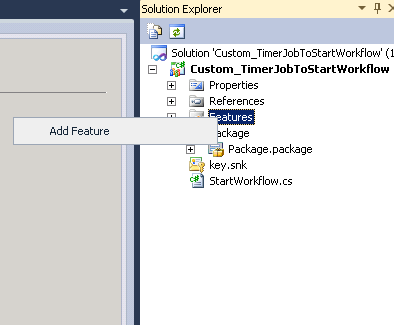
Right Click on the “Feature1″ if you want to rename to any name. I just left it alone in my project. Click on Add Event Receiver.
Right Click on Features in Solution Explorer window and Click on Add Feature.

Right Click on the “Feature1″ if you want to rename to any name. I just left it alone in my project. Click on Add Event Receiver.

Here you can see that the event Receiver class inherits from Microsoft.Sharepoint.SPFeatureReceiver and this class handles events raised during feature activation, deactivation, installation, uninstallation and upgrade. But, in our case we only need FeatureActivated and FeatureDeactivated event handler to install or uninstall our custom timer job.
Below is the code:
Below is the code:
using System;
using System.Runtime.InteropServices;
using System.Security.Permissions;
using Microsoft.SharePoint;
using Microsoft.SharePoint.Security;
using Microsoft.SharePoint.Administration;
using System.Runtime.InteropServices;
using System.Security.Permissions;
using Microsoft.SharePoint;
using Microsoft.SharePoint.Security;
using Microsoft.SharePoint.Administration;
namespace Custom_TimerJobToStartWorkflow.Features.Feature1
{
///
{
///
///
///
/// The GUID attached to this class may be used during packaging and should not be modified.
///
/// The GUID attached to this class may be used during packaging and should not be modified.
///
[Guid(“c33883e2-ee9a-4ec2-b042-be9d5ab1dad4″)]
public class Feature1EventReceiver : SPFeatureReceiver
{
const string List_JOB_NAME = “Start Worflow from Timer Job”;
// Uncomment the method below to handle the event raised after a feature has been activated.
public class Feature1EventReceiver : SPFeatureReceiver
{
const string List_JOB_NAME = “Start Worflow from Timer Job”;
// Uncomment the method below to handle the event raised after a feature has been activated.
public override void FeatureActivated(SPFeatureReceiverProperties properties)
{
SPSite site = properties.Feature.Parent as SPSite;
DeleteJob(site);
CreateJob(site);
}
{
SPSite site = properties.Feature.Parent as SPSite;
DeleteJob(site);
CreateJob(site);
}
private static void DeleteJob(SPSite site)
{
foreach (SPJobDefinition job in site.WebApplication.JobDefinitions)
if (job.Name == List_JOB_NAME)
job.Delete();
}
{
foreach (SPJobDefinition job in site.WebApplication.JobDefinitions)
if (job.Name == List_JOB_NAME)
job.Delete();
}
private static void CreateJob(SPSite site)
{
StartWorkflow job = new StartWorkflow(List_JOB_NAME, site.WebApplication);
SPMinuteSchedule schedule = new SPMinuteSchedule();
schedule.BeginSecond = 0;
schedule.EndSecond = 1;
schedule.Interval = 5;
job.Schedule = schedule;
job.Update();
}
{
StartWorkflow job = new StartWorkflow(List_JOB_NAME, site.WebApplication);
SPMinuteSchedule schedule = new SPMinuteSchedule();
schedule.BeginSecond = 0;
schedule.EndSecond = 1;
schedule.Interval = 5;
job.Schedule = schedule;
job.Update();
}
// Uncomment the method below to handle the event raised before a feature is deactivated.
public override void FeatureDeactivating(SPFeatureReceiverProperties properties)
{
SPSite site = properties.Feature.Parent as SPSite;
foreach (SPJobDefinition job in site.WebApplication.JobDefinitions)
{
if (job.Name == List_JOB_NAME)
job.Delete();
}
{
SPSite site = properties.Feature.Parent as SPSite;
foreach (SPJobDefinition job in site.WebApplication.JobDefinitions)
{
if (job.Name == List_JOB_NAME)
job.Delete();
}
}
// Uncomment the method below to handle the event raised after a feature has been installed.
//public override void FeatureInstalled(SPFeatureReceiverProperties properties)
//{
//}
//{
//}
// Uncomment the method below to handle the event raised before a feature is uninstalled.
//public override void FeatureUninstalling(SPFeatureReceiverProperties properties)
//{
//}
//{
//}
// Uncomment the method below to handle the event raised when a feature is upgrading.
//public override void FeatureUpgrading(SPFeatureReceiverProperties properties, string upgradeActionName, System.Collections.Generic.IDictionary parameters)
//{
//}
}
}
//{
//}
}
}
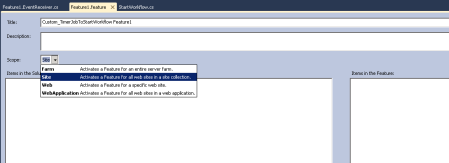
Now, before deploying the timer job, we should select the right scope of the Feature. You can activate the Feature in Farm, Site, Web, WebApplication level. But, in our case we will activate the Feature on Site which is Site Collection. If you try to activate the feature in wrong scope you will get the error.

Now let’s deploy our custom timer job.
Right click on the project name and click Deploy. I guess, the solution should be successfully deployed if you have followed my instructions properly.
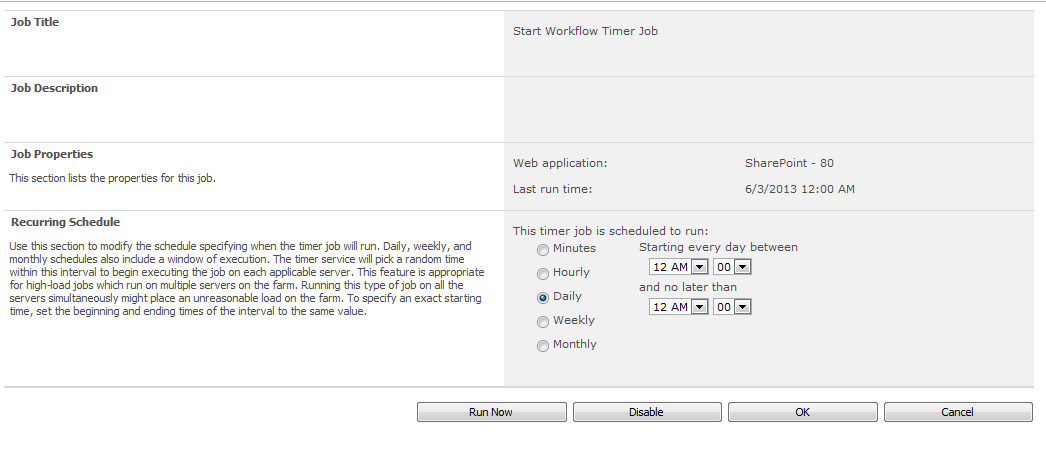
You can change the schedule of the TimerJob to run at particular time. Right now, the timer job runs every 5 minutes which will start the workflow every five minutes. So, if you want to change the timing:
Goto Central Admin, then click on Monitoring and in the Timer Jobs Sections Click on Review Job Definitions then you will see your custom timer job.

Right click on the project name and click Deploy. I guess, the solution should be successfully deployed if you have followed my instructions properly.
You can change the schedule of the TimerJob to run at particular time. Right now, the timer job runs every 5 minutes which will start the workflow every five minutes. So, if you want to change the timing:
Goto Central Admin, then click on Monitoring and in the Timer Jobs Sections Click on Review Job Definitions then you will see your custom timer job.

Click on it and you will see Edit Timer Job Page, where you can Modify Job Schedule based on your requirement.

Note: If you ever make changes in the code, make sure you change the Assembly Information everytime. I had some issues with this when i did not change the Assembly Infomation.
To Change the Assembly information:
Right Click on the Project Name and Click on Properties.
Then in Application Tab, you will see a Assembly Information Button.Click on that you will see Assembly version 1-0-0-0 and File version 1-0-0-0. Just increment 1 in both of those versions before deploying if you ever make any changes in the code.
Comments and Suggestions are highly appreciated.
No comments:
Post a Comment